Use Business Cards to Automate Your Media PC
... with a webcam as the input device
Download here (40kb)
Using a media PC to control your entertainment center is a great idea, and is becoming much more common. With a little persistence, media PCs sit at the center of a powerful, integrated, and unique entertainment hub. In addition, you can build your own fairly inexpensively - especially when compared to the brand name ones.
Unfortunately, most input to a media PC comes through an infrared or radio-driven remote. In the end, you're controlling a full-fledged computer with a high-tech (yet slow and cumbersome) mouse. For example, opening a music playlist usually involves these steps:
1) Turn on the TV (the computer is already on.)
2) Pick up your remote control, and use the clumsy d-pad to move the mouse pointer to "My Music."
3) Use the clumsy double-click buttons, and clumsier d-pad cursor movements to navigate to your desired playlist.
4) Double click the playlist to load it in your media player.
5) Song plays.
6) Turn off the TV and let the music play.
7) (time passes...)
8) Turn on the TV
9) Navigate to the "Close" button of your media player, and click it. If you're lucky, the remote has a button that makes this step easier.
10) Turn off the TV
With Command Card Recognizer, on the other hand, you'll only need these steps:
1) Find the card for the song or playlist you want to play.
2) Place the card in the holder, in front of a webcam.
3) Song plays.
4) (time passes...)
5) Place the stop card in the holder.
Overview
The command card recognition system is based on a mapping of ID numbers to custom-programmed commands. For example, you might assign "ID 1" to a command to reboot Windows, "ID 2" to a command to defrag your hard drive, and "ID 3" to play f:\music\classical\bach\cello_suites.wpl. Using automated image recognition algorithms on the output of a webcam, the Command Card Recognizer interprets these IDs, and executes the associated command.
Components
This package includes three components:
|
|
Catalog Manager |
The Catalog Manager lets you maintain your database of IDs, Descriptions, and Commands. It also lets you print out specially formatted business cards. These business cards are printed in such a way that the Command Card Recognizer can extract the ID from them, when presented through a webcam. It stores your database in CardCatalog.xml. |
|
|
Playlist Generator |
If you've ripped your music collection onto your hard drive (or a network share on your home network,) you've probably settled on a well-defined directory structure. The Playlist Generator lets you drag this directory structure onto a drop box. When you do, it auto-generates playlists for all directories that contain music. It also provides an "export" function to help you more put this information into your Card Catalog xml file. |
|
|
Command Card Recognizer |
The Command Card Recognizer does most of the heavy-lifting in this suite, with the help of a set of cards generated by the Catalog Manager. When you place a card in front of your webcam, the Command Card Recognizer automatically interprets it and executes the corresponding action. |


Catalog Manager
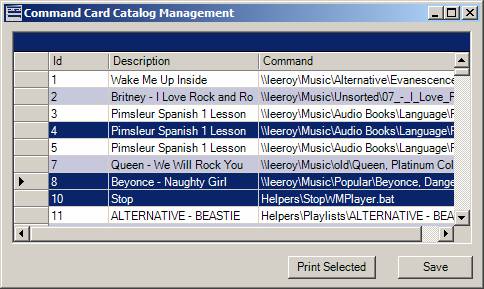
The Catalog Manager lets you manage your collection of "Card Commands." These commands can be anything you can do in Windows by double clicking on a file. In the above example, IDs 1-8 are mapped to individual MP3s and WMAs. ID 10 is mapped to a batch file (in the "Helpers" directory,) and ID 11 is mapped to a playlist.
However, your catalog won't start out this way, so let's walk you through the process.
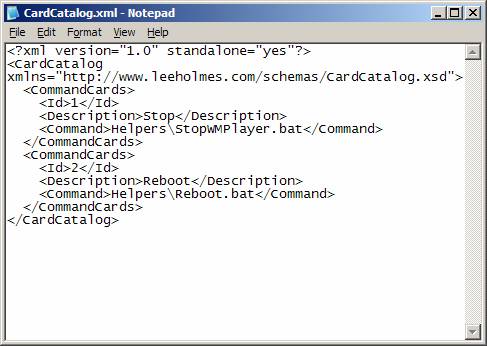
First, open up CatalogManager.exe. You'll notice that it's already got a Command Card programmed to close Windows Media Player.

If you want to add another command, simply click on the bottom line of the catalog. We'll add one to reboot the computer.
Place the following in a text file called "Reboot.bat" inside the Helpers directory:
shutdown -r -t 0
Now, click on the blank line in your catalog and enter the following information:
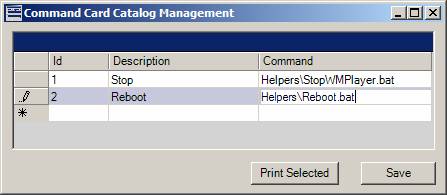
The ID must be unique, and less than 1048575. As mentioned earlier, the Command can be any file you can double click in Windows. This means that you can't pass command-line arguments to any programs, but you can easily write batch files to accomplish that task.
Click "Save" to save your work, and close the program. We'll return in a moment to print your catalog.
Playlist Generator
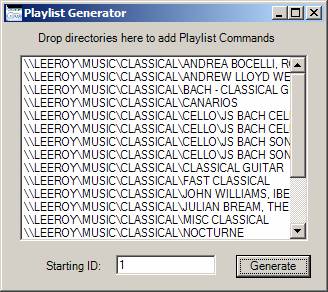
If you have a digital music library of any size, you're not going to want to enter each song and playlist manually into the Catalog Manager. Instead, load PlaylistGenerator.exe.
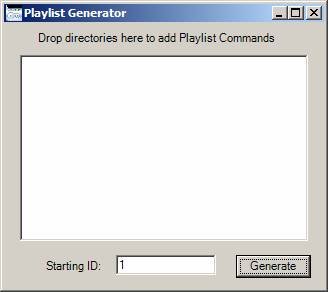
You'll notice an empty box that asks you to drag directories onto it. For each directory that you drag onto the box, the Playlist Generator will create a playlist for it. If the directory contains other directories, the Playlist Generator will create playlists for those as well.
The playlists will point to these exact directories, so make sure that they are accessible from the computer that you ultimately install this system onto.
Since the last ID number in your Command Card Catalog is #2, update "Starting ID" to 3, and click Generate. You receive the confirmation:

Close the Playlist generator, and then open CardCatalog.xml in Notepad:
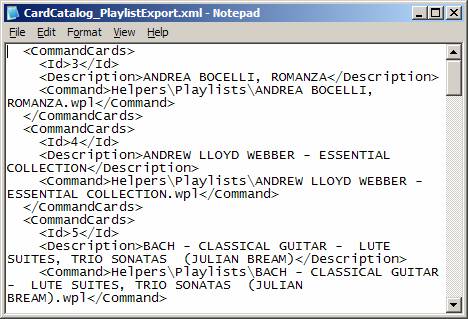
Also open CardCatalog_PlaylistExport.xml in Notepad:
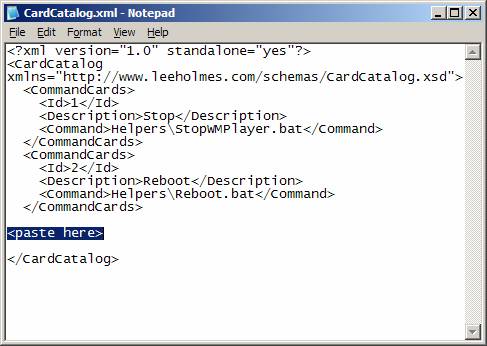
Select all of the text in CardCatalog_PlaylistExport.xml, copy it to your clipboard, and paste it just before </CardCatalog> in CardCatalog.xml:
Save CardCatalog.xml, and close both Notepad windows. You no longer need CardCatalog_PlaylistExport.xml, so feel free to delete it.
Open the Catalog Manager again, and notice your much fuller catalog:

The final step is to print your catalog onto business cards.
For this step, run to the store and buy a package of pre-perforated business card stock. The software assumes that you buy cards compatible with the standard Avery 10-up template. Specific template numbers are usually #8371 or #5371 - 0.5" top margin, and 0.75" left margin.
With test paper in your printer, select 20 rows in your catalog, and click "Print Selected." The Catalog Manager sends 2 pages of cards to your printer. Once you've verified that they fit within the bounds of the business card stock perforations, print your entire catalog!
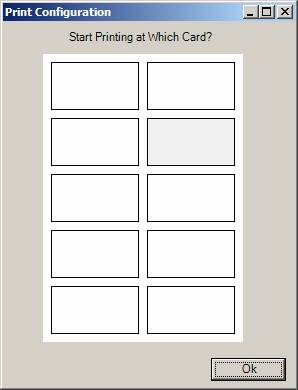
If you need to print individual cards at individual locations on the page, the Catalog Manger gives you that option as well:
Command Card Recognizer
With a nice stack of specially printed business cards in hand, the next step is to load the Command Card Recognizer.
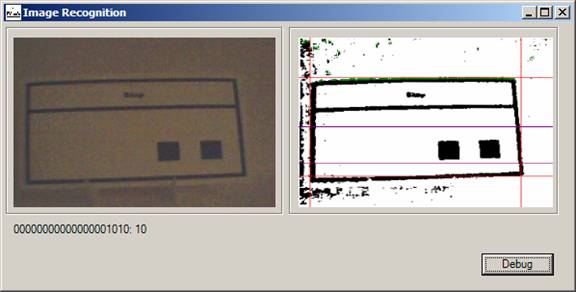
The Command Card Recognizer monitors its installation directory for a file called "capture.jpg." When the file changes, it uses image recognition algorithms on the printed code to determine which ID the card represents. From there, it runs the command that you've associated with that ID.
The Command Card Recognizer doesn't actually capture these webcam images, though. There is tons of software to do this, and do this well. I use a software package called "WheresJames Webcam Publisher", from http://www.wheresjames.com/. To make the system most efficient, configure your webcam software to snap a picture of your card stand only when it detects motion. If your software doesn't support that, set it to automatically take a picture every 3-4 seconds. For each method, set it to save the output as 'capture.jpg' in the Image Recognition installation directory.
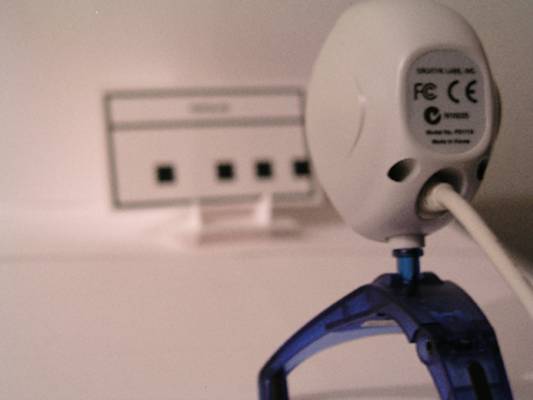
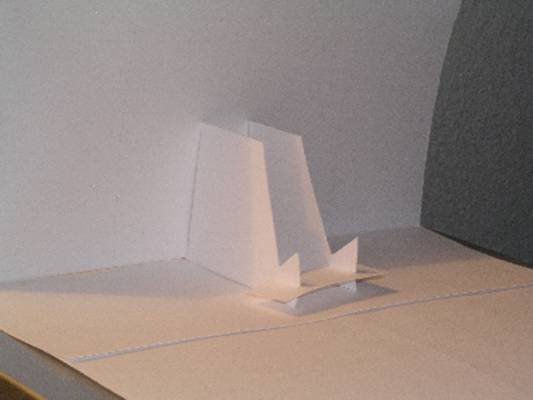
Designing a Card Stand
To make the image recognition job as easy as possible for the Image Recognizer, you want to present it with images that are fairly centred, fairly straight, and fairly free of shadows.
To accomplish this, I cut up a few business cards and glued them together (along with a backboard, and floor.)
And there you have it! You can see a video of this in action here (4mb). You can also see the page that made me want to do this, Flat Feet Peet's Music Box.